
- A well presented drawing can make the eyes ignore some of its minor flaws.
- So before sketching you should plan the layout of the sheet.
- Keep in mind that brown or dark colored sheets make the sketches (especially pencil sketches) look extremely dull.
- The font used in writing is also very important. So a little knowledge about calligraphy will definitely help to enhance the presentation.
- Formatting and maintaining the sheet is the key to a successful presentation. Make sure the sheets do not develop dog-ears(ends folded) Also take care while folding the sheets. Roll the sheets properly and make sure you use a butter-sheet or newspaper to cover your drawing.
Showing posts with label Equipment. Show all posts
Showing posts with label Equipment. Show all posts
Sunday, April 4, 2010
Presentation of a drawing or sketch


Sunday, March 28, 2010
Rotor Ink Sketching - Equipment
In my previous post I wrote about the equipment used to create pencil sketches. Now I will talk about equipment used to create rotor ink sketches like the one below.

Rotor Ink sketches are extremely time-consuming to create. I had earlier posted how you can evaluate whether you want to create pencil or ink sketches here.
The method used to choose the type of paper remains the same as with pencil sketches. However the other items required are different. Here is a snapshot of the equipment required to create ink sketches.

Rotor Ink Pens
Rotor Ink pens primarily differ from each other due to the thickness and shape of the nibs. They tend to be rather fragile and require some maintenance and cleaning. They are generally quite expensive, so make sure you maintain them well. Investing in a good set is worth the money because the better sets tend to be easier to maintain and draw with.
A full set of pens would have the following nib sizes: 0.13, 0.18, 0.25, 0.35, 0.5, 0.7, 1.0, 1.5, and 2.0 mm.
Here is a more detailed view of a pen.

Ink Erasers
Editing ink drawings is extremely difficult unless you have an eraser of very good quality. The image that shows the complete set at the top of this post shows a dual eraser (one side for pencil and the other for ink).
For extremely difficult edits, use whitening ink or whitening pens as shown below.


Rotor Ink sketches are extremely time-consuming to create. I had earlier posted how you can evaluate whether you want to create pencil or ink sketches here.
The method used to choose the type of paper remains the same as with pencil sketches. However the other items required are different. Here is a snapshot of the equipment required to create ink sketches.
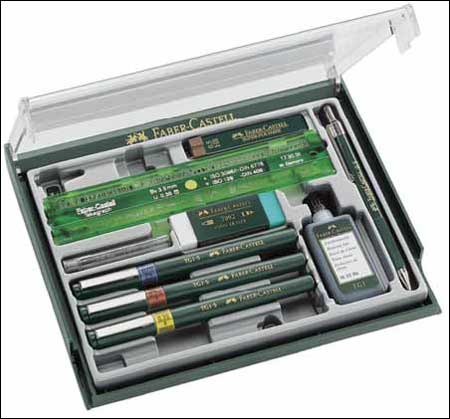
Rotor Ink Pens
Rotor Ink pens primarily differ from each other due to the thickness and shape of the nibs. They tend to be rather fragile and require some maintenance and cleaning. They are generally quite expensive, so make sure you maintain them well. Investing in a good set is worth the money because the better sets tend to be easier to maintain and draw with.
A full set of pens would have the following nib sizes: 0.13, 0.18, 0.25, 0.35, 0.5, 0.7, 1.0, 1.5, and 2.0 mm.
Here is a more detailed view of a pen.

Make sure you use water soluble inks in the pen so that cleaning the pen is easy. These pen nibs are extremely delicate. If you do not clean the nibs before use, the ink could have dried at the tip of the nib.
A major point for using ink pens is that you can use different colored inks to highlight various portions of your drawings.
Ink Erasers
Editing ink drawings is extremely difficult unless you have an eraser of very good quality. The image that shows the complete set at the top of this post shows a dual eraser (one side for pencil and the other for ink).
For extremely difficult edits, use whitening ink or whitening pens as shown below.

Wednesday, March 24, 2010
Pencil Sketching - Equipment
How good you are at sketching comes down to how much you practice. Sketching is an art that requires patience and precision. However the kind of equipment chosen can make a big difference to the quality of the sketch. Here are some of the important components that are needed to create a great pencil sketch
Pencils
Pencils generally come in four grades: H, B, F, and, HB.
The chart below shows the tone produced by each grades of pencils.

H or Hard pencils produce a lighter tone, while the B or black pencils produce deeper and darker tones. The B pencils have a soft lead that tend to crumble easily while the H pencils are quite brittle.
I have always preferred to use Faber-Castell or Apsara pencils for sketching. Although it is commonly assumed that pricier pencils produce results, unless you notice a huge difference in the quality of your sketches, go for the cheaper brands. I have never seen a noticeable difference myself between the more expensive brands and the more reasonably priced ones. I would love to hear from you if you know of any brands that you feel are excellent for sketching. Please feel free to leave comments for this post.
Sharpening blades
 For best results with your pencils, it is very important to sharpen them properly. Regardless of what brand of pencil you use, you can get beautiful textures from your pencils if you sharpen them well.
Here is a link I found that has some really good information on the different methods to sharpen pencils.
Make sure you have a sharp blade when you do sharpen your pencils. Blunt blades can cause you to cut yourself or break the pencil leads.
I have preferred using blades for sharpening pencils. The normal pencil sharpener is good for producing points that can be used to draw straight lines. However, the blades give you flexibility to create different types of points that are useful for shading, drawing lines etc. Do not despair or give up if you are unable to sharpen properly with a blade initially. It can take a while to master sharpening with a blade. I have broken many a pencil on the way to becoming adept with a blade.
 Sandpaper is also an excellent way to sharpen just the lead of the pencil. Especially, the B grade pencils that are difficult to sharpen to a point.
Erasers

As they say failures are the stepping stones to success. The good thing about a pencil sketch is that you can make mistakes and edit them easily. However it is very important to use non-dust erasers to do so.
The reason I stress non-dust erasers is because, eraser dust from a normal eraser can make a big mess of your sketch. It can smudge your sketch and leave indelible black marks on the paper.
Choose the type and texture of paper for your sketch with care. The right choice of paper greatly enhances the outcome of the sketch.
There are many paper types. Some that I have found suitable for sketching are:
Butter paper sheets or wax paper sheets are invaluable to preserve your drawings. Make sure that once you finalize your sketch, you roll them up with a butter sheet on top of the sketch. Otherwise your sketch will smudge or fade quickly.
I hope that you find the above post useful. I will be covering equipment for Rotor Ink sketches in my next post.
Pencils
Pencils generally come in four grades: H, B, F, and, HB.
The chart below shows the tone produced by each grades of pencils.

H or Hard pencils produce a lighter tone, while the B or black pencils produce deeper and darker tones. The B pencils have a soft lead that tend to crumble easily while the H pencils are quite brittle.
I have always preferred to use Faber-Castell or Apsara pencils for sketching. Although it is commonly assumed that pricier pencils produce results, unless you notice a huge difference in the quality of your sketches, go for the cheaper brands. I have never seen a noticeable difference myself between the more expensive brands and the more reasonably priced ones. I would love to hear from you if you know of any brands that you feel are excellent for sketching. Please feel free to leave comments for this post.
Sharpening blades
 For best results with your pencils, it is very important to sharpen them properly. Regardless of what brand of pencil you use, you can get beautiful textures from your pencils if you sharpen them well.
Here is a link I found that has some really good information on the different methods to sharpen pencils.
Make sure you have a sharp blade when you do sharpen your pencils. Blunt blades can cause you to cut yourself or break the pencil leads.
I have preferred using blades for sharpening pencils. The normal pencil sharpener is good for producing points that can be used to draw straight lines. However, the blades give you flexibility to create different types of points that are useful for shading, drawing lines etc. Do not despair or give up if you are unable to sharpen properly with a blade initially. It can take a while to master sharpening with a blade. I have broken many a pencil on the way to becoming adept with a blade.

Erasers

As they say failures are the stepping stones to success. The good thing about a pencil sketch is that you can make mistakes and edit them easily. However it is very important to use non-dust erasers to do so.
The reason I stress non-dust erasers is because, eraser dust from a normal eraser can make a big mess of your sketch. It can smudge your sketch and leave indelible black marks on the paper.
Choose the type and texture of paper for your sketch with care. The right choice of paper greatly enhances the outcome of the sketch.
There are many paper types. Some that I have found suitable for sketching are:
- Cartridge sheets
- Criss-cross sheets
- Hand made paper
- Butter Sheets (used for tracing)
- Scale of the drawing - Choose larger sheets for bigger or more elongated buildings. Make sure to use the landscape or portrait alignment carefully before starting the sketch.
- Level of detailing required - Don't choose dull, textured paper if your sketches require straight, crisp lines or if you are showing intricate details as they will not stand out on these types of paper. Conversely, do not choose crisp paper for sketches that require a lot of shading.
- Subject of the drawing - Historical drawings tend to require more textured paper such as hand made sheets. Papers in shades of yellow or cream suit these sketches more. On the other hand, Contemporary drawings look better on clean, white paper such as criss-cross or cartridge papers. Choose thicker hand made paper if you want to incorporate smudge effects in your drawings.
Butter paper sheets or wax paper sheets are invaluable to preserve your drawings. Make sure that once you finalize your sketch, you roll them up with a butter sheet on top of the sketch. Otherwise your sketch will smudge or fade quickly.
I hope that you find the above post useful. I will be covering equipment for Rotor Ink sketches in my next post.
Subscribe to:
Posts (Atom)
