Pages


Showing posts with label Rotor Ink. Show all posts

Sunday, March 28, 2010

Sketching tips

As I've mentioned in earlier posts, sketching is something you become better at with practice. Your strokes and style only improve with effort and patience.

However, here are some things that I have learnt.

  • Try not to smudge your drawings too much. The more you smudge your drawings, the less clear the drawings. That is where good dust-free erasers for pencil sketches and high quality ink erasers are invaluable. Also, when using ink pens, allow the ink on the paper to dry. Often this leads to mistakes that mess up the sketch.
  • Make sure that you use the appropriate type of pencil or pen to create the sketch. Using the wrong pen or pencil can make your drawing illegible. Make sure the nibs are clean and pencils sharpened appropriately before use. This prevents costly mistakes that force you to redo the sketch.
  • When creating pencil sketches, hold the pencil properly. What this means is that only the lead of the pencil should be in contact with the paper. If your hand or fingers rub against the paper continuously, your sketches will have a lot of smudge marks.
  • If you have to create straight lines, draw the line gradually in small parts. This way you can correct any mistakes quickly.
  • Be careful about the type of paper you choose to make a sketch. If you are learning the art of sketching, choose a paper that allows you to erase easily. Do not choose hand-made paper or other paper on which editing is difficult.
  • Most importantly, do not sketch in haste. Take your time to draw. The more effort you put into creating a good sketch, the better it will turn out.

The above sketch is a good example of what not to do. The sketch above was one of my first efforts of creating a large sketch. I committed all the errors mentioned above. This resulted in the drawing being smudged and unclear.

Rotor Ink Sketching - Equipment

In my previous post I wrote about the equipment used to create pencil sketches. Now I will talk about equipment used to create rotor ink sketches like the one below.


Rotor Ink sketches are extremely time-consuming to create. I had earlier posted how you can evaluate whether you want to create pencil or ink sketches here.

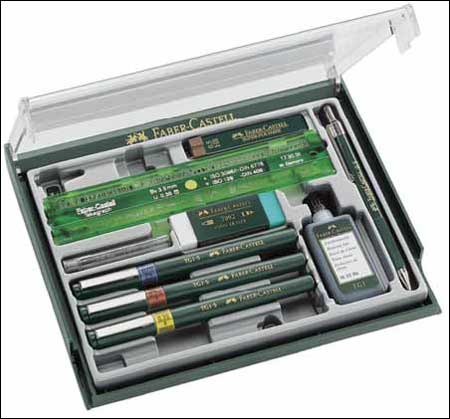
The method used to choose the type of paper remains the same as with pencil sketches. However the other items required are different. Here is a snapshot of the equipment required to create ink sketches.


Rotor Ink Pens


Rotor Ink pens primarily differ from each other due to the thickness and shape of the nibs. They tend to be rather fragile and require some maintenance and cleaning. They are generally quite expensive, so make sure you maintain them well. Investing in a good set is worth the money because the better sets tend to be easier to maintain and draw with.

A full set of pens would have the following nib sizes: 0.13, 0.18, 0.25, 0.35, 0.5, 0.7, 1.0, 1.5, and 2.0 mm.

Here is a more detailed view of a pen.


Make sure you use water soluble inks in the pen so that cleaning the pen is easy. These pen nibs are extremely delicate. If you do not clean the nibs before use, the ink could have dried at the tip of the nib. 

A major point for using ink pens is that you can use different colored inks to highlight various portions of your drawings. 

Ink Erasers


Editing ink drawings is extremely difficult unless you have an eraser of very good quality. The image that shows the complete set at the top of this post shows a dual eraser (one side for pencil and the other for ink).

For extremely difficult edits, use whitening ink or whitening pens as shown below.

Monday, March 22, 2010

Sketching - Types of architectural sketching

Types of Sketching

Manual sketching broadly falls under two categories:

1. Pencil sketching

2. Rotor Ink sketching

3. Coloring methods

Pencil sketching

This type of sketching is made using pencils of differing lead thickness. I would recommend novices start out with this type of sketching as mistakes can be erased.

Pros:
  • Easy to edit
  • Show shading variations with less effort
  • Useful for creating outline (concept) sketches and creating drafts
  • Widely available
Cons:
  • Easy to smudge pictures
  • Fades over time
  • Harder to preserve
  • Clarity of the drawing heavily dependent on the type of paper used
Rotor Ink Sketching

This type of sketching is done using special pens called rotor ink pens. The main feature of the pen is the differing thicknesses of the nibs available for the pen. I would recommend that you get some practice sketching with pencils before investing in the rotor ink pen.

Pros:
  • Excellent sketch clarity
  • Easy to preserve
  • Different ink colors available
  • Delicate detailing possible without smudging
Cons:
  • Expensive to buy equipment
  • Fragile nibs
  • Not available everywhere
  • Nibs need lot of maintenance - The ink dries and clogs up the tip of the nib. This can be extremely difficult to clean. So make sure you use the nibs frequently - or clean the nibs after use immediately.
  • Difficult to edit
Coloring methods

There are different types of coloring methods. Some of the methods I have used include dry crayons, charcoal sticks, color pencils, crayons, pastels, watercolors and oils, and, sketch pens.

These are generally used to create detailing and shading effects to drawings created using pencils or rotor ink. This is an extremely useful for color coding sketches such as landscaping, highlighting sections and differentiating types of walls etc.

If you have any specific questions regarding this please feel to leave me a comment or email me at swathy dot sivaraman at gmail dot com.

Coming up ... Sketching

The title picture of the blog has a couple of sketches that I created for my History of Architecture portfolio. Here are a few more sketches that I have created for that class.

Pencil Sketches


Rotor Ink


Feel free to leave me any comments about my sketches. I will go into detail about sketching in my next post.

I will elucidate more about:
  • Types of sketching in architecture
  • Equipment needed for drawings
  • Sheet Layout
  • Scaling and proportion
  • Clarity of sketches
  • Presenting the sketch with respect to equipment used
  • Detailing of the drawing
  • Preserving sketches